gitlab数据迁移 记录
由于服务器到期,需要将gitlab进行一下数据迁移,可是原来的gitlab是早期版本,早期版本配置相当繁琐,升级为新版本gitlab8, 数据迁移又成了问题,下面记录下配置过程中的重点问题
1. 安装 gitlab
以前安装gitlab 需要安装ruby,mysql,redis等,
现在只需使用rpm 包直接安装即可
如: https://packages.gitlab.com/gitlab/gitlab-ce/packages/el/6/gitlab-ce-8.6.3-ce.0.el6.x86_64.rpm
注: 由于国内墙的原因可能下载不下来,要翻墙才行
下载完毕执行: rpm -ivh gitlab-ce-8.6.3-ce.0.el6.x86_64.rpm
顺序执行:
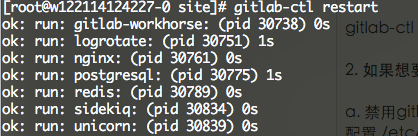
gitlab-ctl reconfigure
gitlab-ctl restart
2. 如果想要使用自定义的 nginx 如何配置
a. 禁用gitlab 启动时去启动nginx ,
配置 /etc/gitlab/gitlab.rb 里的 nginx['enable'] = false 即可
第一次启动时这里不可以关闭,因为关闭了将不再生成对应的nginx权限组,先启动一次,测试一下是否正常,如果正常了,再关闭
这里没有nginx了:
b. 启用自己的nginx 配置:
默认的nginx配置: /var/opt/gitlab/nginx/conf/gitlab-http.conf
git.updateweb.cn.conf 的内容如下:
# GITLAB
# Maintainer: @randx

# CHUNKED TRANSFER
# It is a known issue that Git-over-HTTP requires chunked transfer encoding [0] which is not
# supported by Nginx < 1.3.9 [1]. As a result, pushing a large object with Git (i.e. a single large file)
# can lead to a 411 error. In theory you can get around this by tweaking this configuration file and either
# - installing an old version of Nginx with the chunkin module [2] compiled in, or
# - using a newer version of Nginx.
#
# At the time of writing we do not know if either of these theoretical solutions works. As a workaround
# users can use Git over SSH to push large files.
#
# [0] https://git.kernel.org/cgit/git/git.git/tree/Documentation/technical/http-protocol.txt#n99
# [1] https://github.com/agentzh/chunkin-nginx-module#status
# [2] https://github.com/agentzh/chunkin-nginx-module

server {
  listen 80;
  server_name git.updateweb.cn;
  rewrite ^(.*) https://$server_name$1 permanent;
}

upstream gitlab-workhorse {
  server unix:/var/opt/gitlab/gitlab-workhorse/socket;
}

server {
#  listen *:80;         # e.g., listen 192.168.1.1:80; In most cases *:80 is a good idea
  listen 443;
  ssl                  on;
  ssl_certificate      /etc/nginx/ssl_key/gitlab.crt;
  ssl_certificate_key  /etc/nginx/ssl_key/gitlab.key;

  ssl_session_timeout 10m;
  ssl_protocols SSLv2 SSLv3 TLSv1;
  ssl_ciphers ALL:!ADH:!EXPORT56:RC4+RSA:+HIGH:+MEDIUM:+LOW:+SSLv2:+EXP;
  ssl_prefer_server_ciphers on;

  server_name git.updateweb.cn;     # e.g., server_name source.example.com;
  server_tokens off;     # don't show the version number, a security best practice
  root /opt/gitlab/embedded/service/gitlab-rails/public;

  # Increase this if you want to upload large attachments
  # Or if you want to accept large git objects over http
  #client_max_body_size 128M;
  client_max_body_size 0;

  # individual nginx logs for this gitlab vhost
  access_log  /srv/logs/nginx/gitlab_access.log;
  error_log   /srv/logs/nginx/gitlab_error.log;

  location / {
    proxy_read_timeout      300;
    proxy_connect_timeout   300;
    proxy_redirect          off;

    proxy_http_version 1.1;

    proxy_set_header Host $http_host;
    proxy_set_header X-Real-IP $remote_addr;
    proxy_set_header X-Forwarded-For $proxy_add_x_forwarded_for;
    proxy_set_header X-Forwarded-Proto http;

    proxy_pass http://gitlab-workhorse;
  }

  location ~ ^/(assets)/  {
    root /opt/gitlab/embedded/service/gitlab-rails/public;
    gzip_static on; # to serve pre-gzipped version
    expires max;
    add_header Cache-Control public;
  }

  error_page 404 /404.html;
  error_page 422 /422.html;
  error_page 500 /500.html;
  error_page 502 /502.html;
  location ~ ^/(404|422|500|502)\.html$ {
    root /opt/gitlab/embedded/service/gitlab-rails/public;
    internal;
  }
}
c. 启用自己的linux 后,发现git进行push 报权限错误,

网站也会报错:
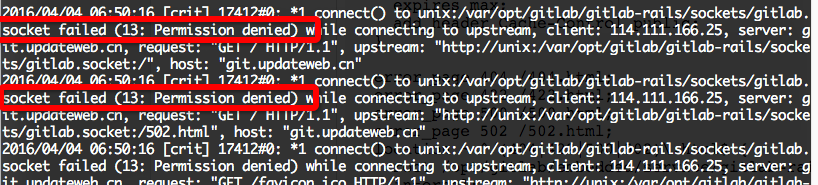
解决方法是加一上权限即可:
usermod -a -G gitlab-www www
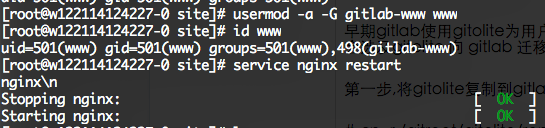
这样就可以解决以上权限问题了,注意,如果你gitlab-ctl recongure 了,会将权限组给删除掉,需要重新加一下权限
d. 删除程序
rm -rf /var/opt/gitlab/
rm -rf /etc/gitlab/
rm -rf /opt/gitlab
rm -rf /var/log/gitlab
3. gitolite数据向 gitlab 迁移
早期gitlab使用gitolite为用户提供SSH服务,新版gitlab有了更好的解决方案gitlab-shell。安装新版本是必会涉及gitolite 向 gitlab 迁移,下面是我总结的一些迁移经验。
第一步,将gitolite复制到gitlab仓库目录下
# cp -r /gitroot/gitolite/repositories/* /var/opt/gitlab/git-data/repositories/
执行导入处理程序
# gitlab-rake gitlab:import:repos
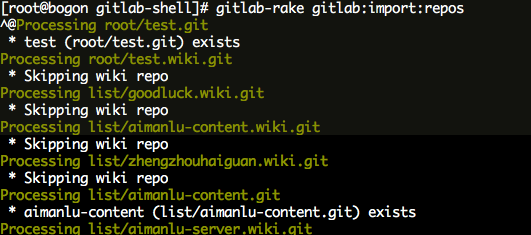
进入gitlab web界面,创建仓库与导入的仓库同名,这样就完成了导入工作。
此方法,只能导入git 库, 不会导入用户,用户需要自己再新建一下
4. 一个小问题:
就是头像问题,默认的头像地址是 http://www.gravatar.com/ 国内被墙的原因,加载不上来,导致页面看起来很慢的样子
解决办法是:修改 /etc/gitlab/gitlab.rb
# gitlab_rails['gravatar_plain_url'] = 'http://www.gravatar.com/avatar/%{hash}?s=%{size}&d=identicon'
gitlab_rails['gravatar_plain_url'] = 'https://secure.gravatar.com/avatar/%{hash}?s=%{size}&d=identicon'
gitlab_rails['gravatar_ssl_url'] = 'https://secure.gravatar.com/avatar/%{hash}?s=%{size}&d=identicon'

实在不行就禁用了吧, 在setting里进行配置: 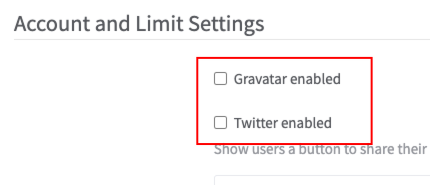
以下 from: https://www.cnblogs.com/weifeng1463/p/11028172.html
GitLab数据备份与恢复创建备份
$ sudo gitlab-rake gitlab:backup:create
执行完备份命令后会在/var/opt/gitlab/backups目录下生成备份后的文件,如1500809139_2017_07_23_gitlab_backup.tar。1500809139是一个时间戳,从1970年1月1日0时到当前时间的秒数。这个压缩包包含Gitlab所有数据(例如:管理员、普通账户以及仓库等等)。
从备份恢复
本节说明如何在另一台主机上恢复数据。
将备份文件拷贝到/var/opt/gitlab/backups下(备份和恢复的GitLab版本尽量保持一致,后文描述了版本不匹配的处理方法)。
停止相关数据连接服务
sudo gitlab-ctl stop unicorn
sudo gitlab-ctl stop sidekiq
从备份恢复
从指定时间戳的备份恢复(backups目录下有多个备份文件时):
sudo gitlab-rake gitlab:backup:restore BACKUP=1500809139
从默认备份恢复(backups目录下只有一个备份文件时):
sudo gitlab-rake gitlab:backup:restore
启动Gitlab
sudo gitlab-ctl start
sudo gitlab-ctl reconfigure
修改默认备份目录【可选】
你也可以通过修改/etc/gitlab/gitlab.rb来修改默认存放备份文件的目录:
gitlab_rails['backup_path'] = '/home/backup'
/home/backup修改为你想存放备份的目录即可, 修改完成之后使用gitlab-ctl reconfigure命令重载配置文件即可。
问题与解决安装指定版本gitlab-ce
curl -s https://packages.gitlab.com/install/repositories/gitlab/gitlab-ce/script.deb.sh | sudo bash
sudo apt-get install gitlab-ce=8.16.6-ce.0
参考链接:
https://about.gitlab.com/installation/#ubuntu
https://packages.gitlab.com/gitlab/gitlab-ce/packages/ubuntu/trusty/gitlab-ce_8.16.6-ce.0_amd64.deb
重装后访问页面出现500或502
在恢复数据时,提示版本不匹配,卸载、指定版本重装后出现500或502错误,网上搜索了很多方法,都不解决问题,最终发现是卸载不彻底引起,完整的卸载方法为:
gitlab-ctl stop
systemctl stop gitlab-runsvdir
# stop gitlab-runsvdir  # centos6.x

rpm -e gitlab-ce
rm -rf /var/opt/gitlab/
rm -rf /etc/gitlab/
rm -rf /opt/gitlab
rm -rf /var/log/gitlab
rm -rf /usr/lib/systemd/system/gitlab-runsvdir.service
# 查看服务状态
service gitlab-runsvdir status
关闭自启动:
vim /etc/init/gitlab-runsvdir.conf
请注意,如果你使用的是CentOS 6或更早的版本,或者你的GitLab安装使用的是不同的服务管理器,你可能需要使用不同的命令或配置文件。例如,如果你的系统使用的是init脚本或Upstart,你可能需要编辑/etc/init/gitlab-runsvdir.conf或/etc/init/gitlab.conf文件,并设置start on指令为禁用自启动的条件。
修改主机域名
sudo vi /etc/gitlab/gitlab.rb
external_url '你的网址'
占用内存过大:
unicorn['worker_processes'] = 2
postgresql['shared_buffers'] = "256MB"
sidekiq['concurrency'] = 2
Aliyun cloud 系统:
安装失败, 尝试了各种方法, 折腾了5个小时, 放弃了, 重新安装系统Centos7.x , rpm -ivh xxx.rpm 顺利安装, 总结下来, 尝试新系统就可能是个坑, 浪费了不少时间..
Centos地址 : https://packages.gitlab.com/gitlab/gitlab-ce/packages/el/7/gitlab-ce-8.6.3-ce.0.el7.x86_64.rpm
尝试使用了最新版本的gitlab.16, 启动一堆服务, 其实只用版本管理, 无耐配置太低, 无法启动, server直接卡住,,,