Centos7 k8s 1.23.3 安装部署之一
系统环境: CentOS Linux release 7.8.2003 (Core)
硬件要求: Cpu调整为2 core 内存调整为 2000M ( 必须 )
网络环境: IP 根据当前环境自行调整:
主机名 | IP |
k8s-master | 192.168.1.104 |
k8s-node1 | 192.168.1.105 |
k8s-node2 | 192.168.1.106 |
可能多次使用的命令:
# 重置配置:
kubeadm reset

# 查看日志:
journalctl -f -u kubelet

# 查看接点加入方式:
kubeadm token create --print-join-command

# 删除方式, 此处添加参数 `--grace-period=0 --force` 用于强制从node删除对应的 container , (未知原因有时container不会删除)
kubectl delete -f deployment.yaml --grace-period=0 --force

#
systemctl restart kubelet
systemctl status kubelet

# ingress 查看
kubectl apply -f ingress.yaml
kubectl get ing
kubectl get ingress
# https://github.com/kubernetes/ingress-nginx
# https://kubernetes.io/docs/concepts/services-networking/ingress/

# ingress-nginx 部署使用及原理简介
参考: https://blog.51cto.com/u_14034751/2647904
# 新版本配置: https://www.cnblogs.com/Netsharp/p/15501138.html
# https://blog.csdn.net/qq_39218530/article/details/115372879

iptables -nL    #查看iptables策略
iptables -P FORWARD ACCEPT

# 如果出现 cnixxx 相关的错误, 可能是因为调整了cidr的值导致的, 可用以下命令进行清理
ip link set cni0 down
brctl delbr cni0
systemctl restart kubelet

命令方式:nmcli
nmtui要求安装了NetworkManager-tui包
nmcli要求安装了NetworkManager包
注:nmtui与nmcli均是通过NetworkManager实现对网络进行配置
设置k8s环境准备条件
分别设置主机名:
# 设置 k8s-master 主机名
hostnamectl set-hostname k8s-master
echo '192.168.1.104 k8s-master' >> /etc/hosts
echo '192.168.1.105 k8s-node1' >> /etc/hosts
echo '192.168.1.106 k8s-node2' >> /etc/hosts

# 设置 k8s-node1 主机名
hostnamectl set-hostname k8s-node1
echo '192.168.1.105 k8s-node1' >> /etc/hosts


# 设置 k8s-node2 主机名
hostnamectl set-hostname k8s-node2
echo '192.168.1.106 k8s-node2' >> /etc/hosts
基础环境配置: k8s-master
# 关闭selinux
# 临时禁用selinux
setenforce 0

# 禁用交换分区
swapoff -a
# 永久禁用,打开/etc/fstab注释掉swap那一行。
sed -i 's/.*swap.*/#&/' /etc/fstab


curl -o /etc/yum.repos.d/CentOS-Base.repo http://mirrors.aliyun.com/repo/Centos-7.repo

# 删除之前的cni 网络信息
ip link set cni0 down
brctl delbr cni0

# 安装依赖
yum install -y epel-release conntrack ipvsadm ipset jq sysstat curl iptables libseccomp

# 关闭防火墙
systemctl disable firewalld && systemctl stop firewalld

# 设置iptables
iptables -F && iptables -X && iptables -F -t nat && iptables -X -t nat && iptables -P FORWARD ACCEPT

# 禁用 SELinux
# 永久关闭 修改/etc/sysconfig/selinux文件设置
sed -i 's/SELINUX=permissive/SELINUX=disabled/' /etc/sysconfig/selinux
sed -i "s/SELINUX=enforcing/SELINUX=disabled/g" /etc/selinux/config

# 加载内核模块
cat > /etc/sysconfig/modules/ipvs.modules <<EOF
#!/bin/bash
modprobe -- ip_vs
modprobe -- ip_vs_rr
modprobe -- ip_vs_wrr
modprobe -- ip_vs_sh
modprobe -- nf_conntrack_ipv4
modprobe -- br_netfilter
EOF

# 修改访问权限
chmod 755 /etc/sysconfig/modules/ipvs.modules && bash /etc/sysconfig/modules/ipvs.modules

# 配置内核参数,将桥接的IPv4流量传递到iptables的链
cat << EOF | tee /etc/sysctl.d/k8s.conf
net.bridge.bridge-nf-call-iptables=1
net.bridge.bridge-nf-call-ip6tables=1
net.ipv4.ip_forward=1
net.ipv4.tcp_tw_recycle=0
vm.swappiness=0
vm.overcommit_memory=1
vm.panic_on_oom=0
fs.inotify.max_user_watches=89100
fs.file-max=52706963
fs.nr_open=52706963
net.ipv6.conf.all.disable_ipv6=1
net.netfilter.nf_conntrack_max=2310720
EOF

sysctl -p /etc/sysctl.d/k8s.conf


# docker 安装:
# 安装docker所需的工具
yum install -y yum-utils device-mapper-persistent-data lvm2

# 配置阿里云的docker源
yum-config-manager --add-repo http://mirrors.aliyun.com/docker-ce/linux/centos/docker-ce.repo

# 安装 docker-ce docker-ce-cli
yum makecache fast
yum install -y docker-ce docker-ce-cli

# 安装完成后配置启动时的命令,否则 docker 会将 iptables FORWARD chain 的默认策略设置为DROP
sed -i "13i ExecStartPost=/usr/sbin/iptables -P FORWARD ACCEPT" /usr/lib/systemd/system/docker.service


# Kubernetes 默认设置cgroup驱动位为 "systemd" ,而 Docker 服务的cgroup驱动默认为 "cgroupfs",
# 建议将其修改为 “systemd", 与 Kubernetes 保持一致 ##
tee /etc/docker/daemon.json <<-'EOF'
{
  "registry-mirrors": ["https://bnc2bedr.mirror.aliyuncs.com"],
  "exec-opts": ["native.cgroupdriver=systemd"],
  "log-driver": "json-file",
  "log-opts": {
    "max-size": "100m"
  },
  "storage-driver": "overlay2",
  "storage-opts": [
    "overlay2.override_kernel_check=true"
  ]
}
EOF


# 重启Docker 服务
systemctl enable docker && systemctl start docker


# 添加阿里云的K8S源:  k8s-master   k8s-node1    k8s-node2
cat <<EOF > /etc/yum.repos.d/kubernetes.repo
[kubernetes]
name=Kubernetes
baseurl=https://mirrors.aliyun.com/kubernetes/yum/repos/kubernetes-el7-x86_64/
enabled=1
gpgcheck=1
repo_gpgcheck=1
gpgkey=https://mirrors.aliyun.com/kubernetes/yum/doc/yum-key.gpg https://mirrors.aliyun.com/kubernetes/yum/doc/rpm-package-key.gpg
EOF


# 安装kubeadm  kubectl  kubelet
yum install -y kubectl kubeadm kubelet

# 启动kubelet服务
systemctl enable kubelet && systemctl start kubelet

# 查看已经安装的版本
kubelet --version
node 安装: k8s-node1 k8s-node2
基础环境配置: k8s-node
# 关闭selinux
# 临时禁用selinux
setenforce 0

# 禁用交换分区
swapoff -a
# 永久禁用,打开/etc/fstab注释掉swap那一行。
sed -i 's/.*swap.*/#&/' /etc/fstab


curl -o /etc/yum.repos.d/CentOS-Base.repo http://mirrors.aliyun.com/repo/Centos-7.repo

# 安装依赖
yum install -y epel-release conntrack ipvsadm ipset jq sysstat curl iptables libseccomp

# 关闭防火墙
systemctl disable firewalld && systemctl stop firewalld

# 设置iptables
iptables -F && iptables -X && iptables -F -t nat && iptables -X -t nat && iptables -P FORWARD ACCEPT

# 禁用 SELinux
# 永久关闭 修改/etc/sysconfig/selinux文件设置
sed -i 's/SELINUX=permissive/SELINUX=disabled/' /etc/sysconfig/selinux
sed -i "s/SELINUX=enforcing/SELINUX=disabled/g" /etc/selinux/config

# 加载内核模块
cat > /etc/sysconfig/modules/ipvs.modules <<EOF
#!/bin/bash
modprobe -- ip_vs
modprobe -- ip_vs_rr
modprobe -- ip_vs_wrr
modprobe -- ip_vs_sh
modprobe -- nf_conntrack_ipv4
modprobe -- br_netfilter
EOF

# 修改访问权限
chmod 755 /etc/sysconfig/modules/ipvs.modules && bash /etc/sysconfig/modules/ipvs.modules

# 配置内核参数,将桥接的IPv4流量传递到iptables的链
cat << EOF | tee /etc/sysctl.d/k8s.conf
net.bridge.bridge-nf-call-iptables=1
net.bridge.bridge-nf-call-ip6tables=1
net.ipv4.ip_forward=1
net.ipv4.tcp_tw_recycle=0
vm.swappiness=0
vm.overcommit_memory=1
vm.panic_on_oom=0
fs.inotify.max_user_watches=89100
fs.file-max=52706963
fs.nr_open=52706963
net.ipv6.conf.all.disable_ipv6=1
net.netfilter.nf_conntrack_max=2310720
EOF

sysctl -p /etc/sysctl.d/k8s.conf


# docker 安装:
# 安装docker所需的工具
yum install -y yum-utils device-mapper-persistent-data lvm2

# 配置阿里云的docker源
yum-config-manager --add-repo http://mirrors.aliyun.com/docker-ce/linux/centos/docker-ce.repo

# 安装 docker-ce docker-ce-cli
yum makecache fast
yum install -y docker-ce docker-ce-cli

# 安装完成后配置启动时的命令,否则 docker 会将 iptables FORWARD chain 的默认策略设置为DROP
sed -i "13i ExecStartPost=/usr/sbin/iptables -P FORWARD ACCEPT" /usr/lib/systemd/system/docker.service


# Kubernetes 默认设置cgroup驱动位为 "systemd" ,而 Docker 服务的cgroup驱动默认为 "cgroupfs",
# 建议将其修改为 “systemd", 与 Kubernetes 保持一致 ##
tee /etc/docker/daemon.json <<-'EOF'
{
  "registry-mirrors": ["https://bnc2bedr.mirror.aliyuncs.com"],
  "exec-opts": ["native.cgroupdriver=systemd"],
  "log-driver": "json-file",
  "log-opts": {
    "max-size": "100m"
  },
  "storage-driver": "overlay2",
  "storage-opts": [
    "overlay2.override_kernel_check=true"
  ]
}
EOF


# 重启Docker 服务
systemctl enable docker && systemctl start docker


# 添加阿里云的K8S源:  k8s-master   k8s-node1    k8s-node2
cat <<EOF > /etc/yum.repos.d/kubernetes.repo
[kubernetes]
name=Kubernetes
baseurl=https://mirrors.aliyun.com/kubernetes/yum/repos/kubernetes-el7-x86_64/
enabled=1
gpgcheck=1
repo_gpgcheck=1
gpgkey=https://mirrors.aliyun.com/kubernetes/yum/doc/yum-key.gpg https://mirrors.aliyun.com/kubernetes/yum/doc/rpm-package-key.gpg
EOF


# 安装kubeadm  kubelet
yum install -y kubeadm kubelet


echo 'KUBELET_EXTRA_ARGS="--runtime-cgroups=/systemd/system.slice --kubelet-cgroups=/systemd/system.slice"' > /etc/sysconfig/kubelet

# 启动kubelet服务
systemctl enable kubelet && systemctl start kubelet

# 查看已经安装的版本
kubelet --version
如果需要指定版本:
## 安装指定版本
yum install -y kubelet-1.18.0 kubeadm-1.18.0 kubectl-1.18.0 --disableexcludes=kubernetes
二. 初始化 k8s-master 环境 或 kubeadm reset 后都要按以下步骤执行, IP地址需根据实际情况调整
# 因为需要下载 images 需要一些时间, 这里会等待一会儿, IP 按当前网络环境自行修改:
# 说明: https://kubernetes.io/zh/docs/reference/setup-tools/kubeadm/kubeadm-init/
kubeadm init \
--kubernetes-version=1.23.3 \
--apiserver-advertise-address=192.168.1.104 \
--image-repository registry.aliyuncs.com/google_containers \
--service-cidr=10.1.0.0/16 \
--pod-network-cidr=10.244.0.0/16
命令说明:
–pod-network-cidr: 定义pod网段为:10.244.0.0/16
–apiserver-advertise-address:master主机内网IP地址
–image-repository:指定阿里云镜像仓库地址。由于kubeadm 默认从官网http://k8s.grc.io下载所需镜像,国内无法访问,因此需要通过–image-repository指定阿里云镜像仓库地址。
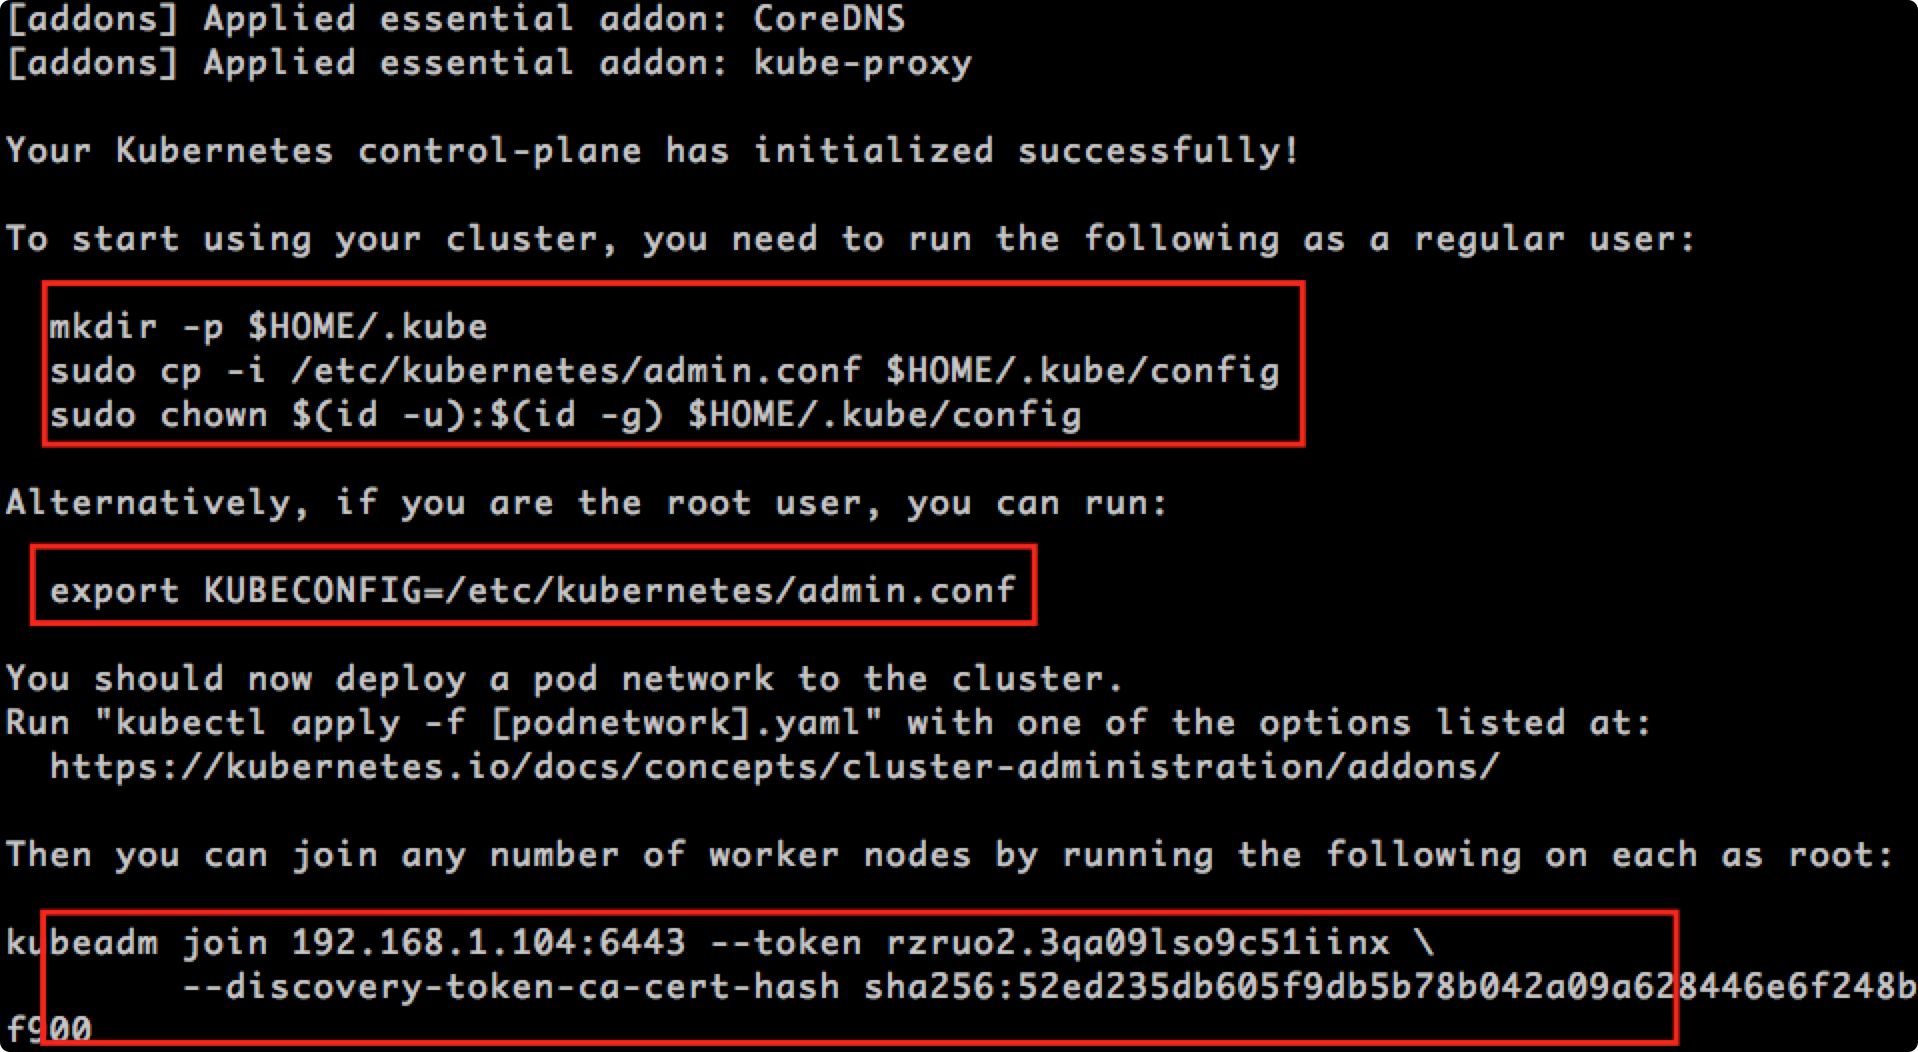
集群初始化会出现如下结果
Your Kubernetes control-plane has initialized successfully!
上面安装完后,会提示你输入如下命令,复制粘贴过来,执行即可。
# 上面安装完成后,k8s会提示你输入如下命令,执行
mkdir -p $HOME/.kube
sudo cp -i /etc/kubernetes/admin.conf $HOME/.kube/config
sudo chown $(id -u):$(id -g) $HOME/.kube/config
如果是root用户请执行: 最好加入到 .zshrc .bashrc, 此处有疑问.... TODO:
export KUBECONFIG=/etc/kubernetes/admin.conf
node机上执行: 此时执行会报错并且执行不成功, 请稍等执行好flannel 再到node机上执行: 如忘记: 可使用命令 kubeadm token create --print-join-command 查看:
kubeadm join 192.168.1.104:6443 --token rzruo2.3qa09lso9c51iinx \
	--discovery-token-ca-cert-hash sha256:52ed235db605f9db5b78b042a09a628446e6f248bc434f5c9dfc0a6a0ea5f900
配置: kube-flannel.yml
# 修改/etc/hosts ,目的是解决无法下载 kube-flannel.yml 情况
echo '199.232.96.133 raw.githubusercontent.com' >> /etc/hosts
curl -k -O https://raw.githubusercontent.com/coreos/flannel/master/Documentation/kube-flannel.yml
kubectl apply -f kube-flannel.yml

重要: ok, 此时去node机上执行 kubeadm join 即可, 这时在node执行 join 时会自动生 /run/flannel/subnet.env 文件, 而不会再报找不到文件的错误!
OK 部署完毕!
后续需要进行 ingress 和 dashboard 的安装
安装dashboard:
https://github.com/kubernetes/dashboard/
设置Kubernetes的Master节点参与应用调度(默认安装Master节点不运行应用)。有两种方法:
长期改变节点的属性,允许Master运行应用,执行:
kubectl taint nodes --all node-role.kubernetes.io/master-
临时允许Master节点执行应用,在应用的yaml文件中添加:
      tolerations:
      - key: node-role.kubernetes.io/master        effect: NoSchedule
======================== 以下为可能遇到的报错信息,及解决方法记录 =============================================
报错: 要求还挺高的:
[init] Using Kubernetes version: v1.23.3
[preflight] Running pre-flight checks
        [WARNING Swap]: swap is enabled; production deployments should disable swap unless testing the NodeSwap feature gate of the kubelet
error execution phase preflight: [preflight] Some fatal errors occurred:
        [ERROR NumCPU]: the number of available CPUs 1 is less than the required 2
        [ERROR Mem]: the system RAM (972 MB) is less than the minimum 1700 MB
        [ERROR DirAvailable--var-lib-etcd]: /var/lib/etcd is not empty
[preflight] If you know what you are doing, you can make a check non-fatal with `--ignore-preflight-errors=...`
To see the stack trace of this error execute with --v=5 or higher
解决方法:
rm -rf /var/lib/etcd
cpu调整为2 core
RAM 调整为 2000M
禁用swap
报错:
[kubelet-check] The HTTP call equal to 'curl -sSL http://localhost:10248/healthz' failed with error: Get "http://localhost:10248/healthz": dial tcp [::1]:10248: connect: connection refused.
[kubelet-check] It seems like the kubelet isn't running or healthy.
[kubelet-check] The HTTP call equal to 'curl -sSL http://localhost:10248/healthz' failed with error: Get "http://localhost:10248/healthz": dial tcp [::1]:10248: connect: connection refused.
[kubelet-check] It seems like the kubelet isn't running or healthy.
[kubelet-check] The HTTP call equal to 'curl -sSL http://localhost:10248/healthz' failed with error: Get "http://localhost:10248/healthz": dial tcp [::1]:10248: connect: connection refused.
[kubelet-check] It seems like the kubelet isn't running or healthy.
[kubelet-check] The HTTP call equal to 'curl -sSL http://localhost:10248/healthz' failed with error: Get "http://localhost:10248/healthz": dial tcp [::1]:10248: connect: connection refused.
[kubelet-check] It seems like the kubelet isn't running or healthy.
[kubelet-check] The HTTP call equal to 'curl -sSL http://localhost:10248/healthz' failed with error: Get "http://localhost:10248/healthz": dial tcp [::1]:10248: connect: connection refused.
解决方法:
cat <<EOF > /etc/docker/daemon.json
{
   "exec-opts": ["native.cgroupdriver=systemd"],
   "registry-mirrors":["https://bnc2bedr.mirror.aliyuncs.com"]
}
EOF
systemctl restart docker
init 成功:
To start using your cluster, you need to run the following as a regular user:

  mkdir -p $HOME/.kube
  sudo cp -i /etc/kubernetes/admin.conf $HOME/.kube/config
  sudo chown $(id -u):$(id -g) $HOME/.kube/config

Alternatively, if you are the root user, you can run:

  export KUBECONFIG=/etc/kubernetes/admin.conf

You should now deploy a pod network to the cluster.
Run "kubectl apply -f [podnetwork].yaml" with one of the options listed at:
  https://kubernetes.io/docs/concepts/cluster-administration/addons/

Then you can join any number of worker nodes by running the following on each as root:

kubeadm join 192.168.1.104:6443 --token y5xxms.514jm8ttg99byfqw \
	--discovery-token-ca-cert-hash sha256:346e61f73686bb756ade89ad02401fab4d66bf12fa1c5be92b2f5ae128aea082
错误信息:
kubectl get pod -o wide
Unable to connect to the server: x509: certificate signed by unknown authority
(possibly because of "crypto/rsa: verification error" while trying to verify candidate authority
certificate "kubernetes")
解决方法:
vim /etc/hosts
199.232.96.133 raw.githubusercontent.com
curl -k -O https://raw.githubusercontent.com/coreos/flannel/master/Documentation/kube-flannel.yml
kubectl apply -f kube-flannel.yml
错误:
r="failed to get cgroup stats for \"/system.slice/docker.service\": failed to get container info for \"/system.slice/docker.service\": unknown container \"/system.slice/docker.service\"" containerName="/system.slice/docker.service"
Feb 01 18:51:41 k8s-master kubelet[967]: E0201 18:51:41.971405     967 summary_sys_containers.go:48] "Failed to get system container stats" err="failed to get cgroup stats for \"/system.slice/docker.service\": failed to get container info for \"/system.slice/docker.service\": unknown container \"/system.slice/docker.service\"" containerName="/system.slice/docker.service"
Feb 01 18:51:51 k8s-master kubelet[967]: E0201 18:51:51.983359     967 summary_sys_containers.go:48] "Failed to get system container stats" err="failed to get cgroup stats for \"/system.slice/docker.service\": failed to get container info for \"/system.slice/docker.service\": unknown container \"/system.slice/docker.service\"" containerName="/system.slice/docker.service"
Feb 01 18:52:01 k8s-master kubelet[967]: E0201 18:52:01.993080     967 summary_sys_containers.go:48] "Failed to get system container stats" err="failed to get cgroup stats for \"/system.slice/docker.service\": failed to get container info for \"/system.slice/docker.service\": unknown container \"/system.slice/docker.service\"" containerName="/system.slice/docker.service"
解决方法:
export KUBECONFIG=/etc/kubernetes/admin.conf
按照以下方法修改后报错消失
# vim /etc/sysconfig/kubelet
KUBELET_EXTRA_ARGS="--runtime-cgroups=/systemd/system.slice --kubelet-cgroups=/systemd/system.slice"
重新加载配置文件
systemctl daemon-reload
systemctl restart kubelet
错误:
kubeadm join 192.168.1.104:6443 --token a6o03y.wvcmk7o1d2c12w3c --discovery-token-ca-cert-hash sha256:bab7991421fd20f55bf1142dcb8a68887a2572deeb5a09e94d11c9935044a0ee
[preflight] Running pre-flight checks
	[WARNING Hostname]: hostname "k8s-node2" could not be reached
	[WARNING Hostname]: hostname "k8s-node2": lookup k8s-node2 on 10.64.0.100:53: no such host
[preflight] Reading configuration from the cluster...
解决方法:
配置/etc/hosts
echo '192.168.1.106 k8s-node2' >> /etc/hosts
master 上的错误:
Feb 01 21:37:16 k8s-node1 kubelet[24981]: E0201 21:37:16.200352   24981 cni.go:362] "Error adding pod to network" err="failed to delegate add: failed to set bridge addr: \"cni0\" already has an IP address different from 10.244.1.1/24" pod="default/nginx-deployment-b5776f7cd-snsq5" podSandboxID={Type:docker ID:bbb4c549c5c801d03458965a892d22871c5f87aa4ce94842b9c6d169ac51816b} podNetnsPath="/proc/43241/ns/net" networkType="flannel" networkName="cbr0"
Feb 01 21:37:16 k8s-node1 kubelet[24981]: E0201 21:37:16.333645   24981 remote_runtime.go:209] "RunPodSandbox from runtime service failed" err="rpc error: code = Unknown desc = failed to set up sandbox container \"bbb4c549c5c801d03458965a892d22871c5f87aa4ce94842b9c6d169ac51816b\" network for pod \"nginx-deployment-b5776f7cd-snsq5\": networkPlugin cni failed to set up pod \"nginx-deployment-b5776f7cd-snsq5_default\" network: failed to delegate add: failed to set bridge addr: \"cni0\" already has an IP address different from 10.244.1.1/24"
解决方法1:
发现是 cni0 网桥配置了一个不同网段的 IP 地址导致,删除该网桥(网络插件会自动重新创建)即可修复
ifconfig

ip link set cni0 down
brctl delbr cni0
systemctl restart kubelet
从集群中删除该 Node。使用公有云时,kube-controller-manager 会在 VM 删除后自动删除对应的 Node。而在物理机部署的集群中,需要管理员手动删除 Node(如 kubectl delete node <node-name>。

Node 恢复正常。Kubelet 会重新跟 kube-apiserver 通信确认这些 Pod 的期待状态,进而再决定删除或者继续运行这些 Pod。

用户强制删除。用户可以执行 kubectl delete pods <pod> --grace-period=0 --force 强制删除 Pod。除非明确知道 Pod 的确处于停止状态(比如 Node 所在 VM 或物理机已经关机),否则不建议使用该方法。特别是 StatefulSet 管理的 Pod,强制删除容易导致脑裂或者数据丢失等问题。