paping使用来测试联通&网站由于tcp协议导致的无法通信问题超时问题
今天上班遇到一个神奇的问题,之所以神奇,是因为自己之前从来没遇到过,就好像之前从来没打过电话,拿到电话,突然发现一根线或线都不需要就可以和千里之外的Ta聊天的感觉
首先介绍一个工具,微软云同事介绍的,用于解决一些服务器禁止Ping, icmp 包响应的另外一种方式:
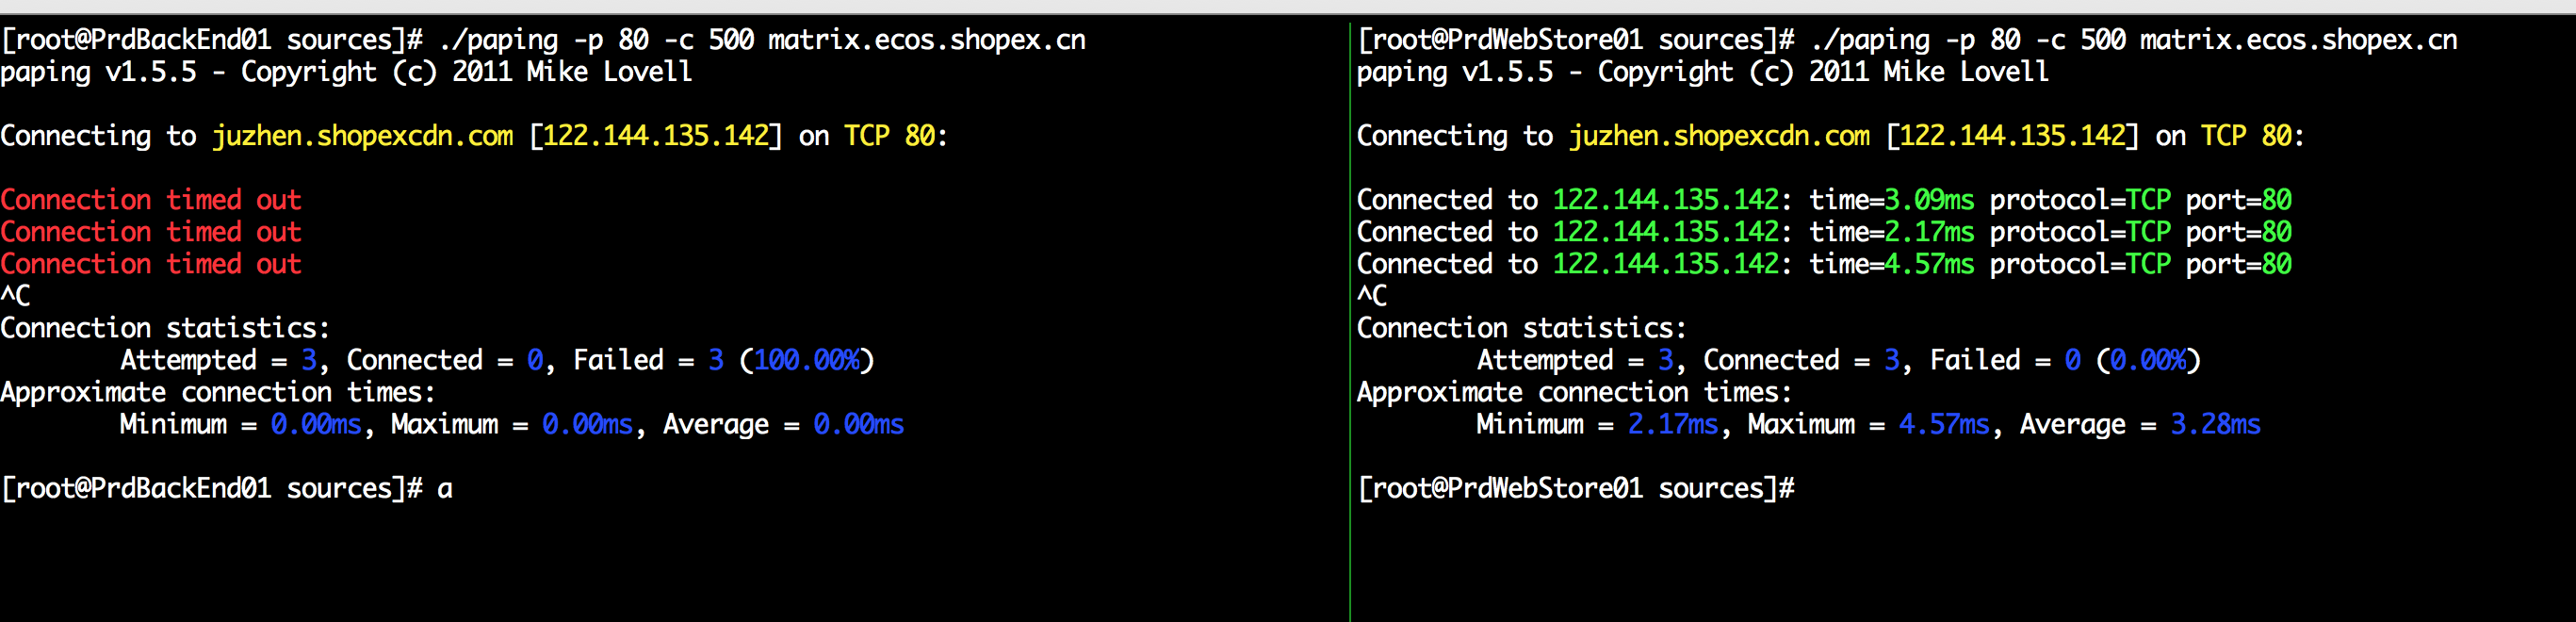
1. 使用paping来测试连通性 Linux 平台: :
wget https://www.updateweb.cn/softwares/paping_1.5.5_x86-64_linux.tar.gz
or
wget https://zhangtaostorage.blob.core.chinacloudapi.cn/share/paping_1.5.5_x86-64_linux.tar.gz
这是一个压缩包,解压方法 tar zvxf paping_1.5.5_x86-64_linux.tar.gz
使用方法 ./paping–p 80 -c 500 www.updateweb.cn (该示例命令为进行500次的 目标IP 80 端口的连通性测试)
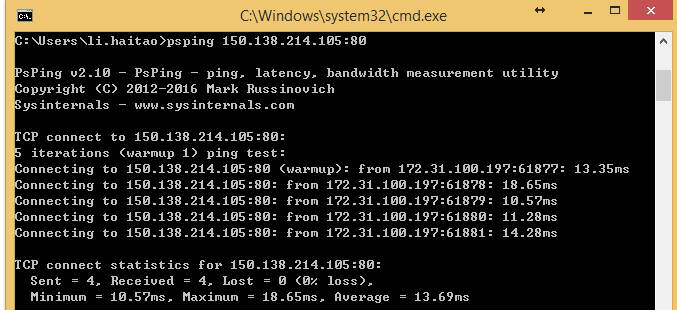
2、使用psping来测试连通性 win平台:
Psping下载地址: https://www.updateweb.cn/softwares/PSTools.zip
OR
Psping下载地址: http://technet.microsoft.com/en-us/sysinternals/jj729731
并且放到C:\Windows\system32目录下
然后在cmd模式下执行:psping ipaddress:port
例如:
-----------------------------------------------------------------------
言归正传:
你发现第一张图,出现了connection timed out 的提示, 而同一网下的另一台机器却连通自在, 第一反应就是防火墙 or 网络黑名单阻止掉了,经过多方一起排查,这个猜想是错误的,
最后解决方法是:
确认一下您的Linux系统的内核参数配置:sysctl -a | grep tcp
sysctl -w net.ipv4.tcp_timestamps=1
sysctl -w net.ipv4.tcp_tw_recycle=0
改为Linux 内核参数:
sysctl -w net.ipv4.tcp_timestamps=0
sysctl -w net.ipv4.tcp_tw_recycle=0
即可, 网络一下子就顺畅了
附注:
---------------------------------------------------------
PsPing v2.01 使用说明
By Mark Russinovich
Published: January 29, 2014
 Download PsTools(1,644 KB)
| Rate: |
Introduction
PsPing implements Ping functionality, TCP ping, latency and bandwidth measurement. Use the following command-line options to show the usage for each test type:
Installation
Copy PsPing onto your executable path. Typing "psping" displays its usage syntax.
Using PsPing
PsPing implements Ping functionality, TCP ping, latency and bandwidth measurement. Use the following command-line options to show the usage for each test type:
Usage: psping -? [i|t|l|b]
| -? I | Usage for ICMP ping. |
| -? T | Usage for TCP ping. |
| -? L | Usage for latency test. |
| -? B | Usage for bandwidth test. |
ICMP ping usage: psping [[-6]|[-4]] [-h [buckets | <val1>,<val2>,...]] [-i <interval>] [-l <requestsize>[k|m] [-q] [-t|-n <count>] [-w <count>] <destination>
| -h | Print histogram (default bucket count is 20). If you specify a single argument, it's interpreted as a bucket count and the histogram will contain that number of buckets covering the entire time range of values. Specify a comma-separated list of times to create a custom histogram (e.g. "0.01,0.05,1,5,10"). |
| -i | Interval in seconds. Specify 0 for fast ping. |
| -l | Request size. Append 'k' for kilobytes and 'm' for megabytes. |
| -n | Number of pings or append 's' to specify seconds e.g. '10s'. |
| -q | Don't output during pings. |
| -t | Ping until stopped with Ctrl+C and type Ctrl+Break for statistics. |
| -w | Warmup with the specified number of iterations (default is 1). |
| -4 | Force using IPv4. |
| -6 | Force using IPv6. |
For high-speed ping tests use -q and -i 0.
TCP ping usage: psping [[-6]|[-4]] [-h [buckets | <val1>,<val2>,...]] [-i <interval>] [-l <requestsize>[k|m] [-q] [-t|-n <count>] [-w <count>] <destination:destport>
| -h | Print histogram (default bucket count is 20). If you specify a single argument, it's interpreted as a bucket count and the histogram will contain that number of buckets covering the entire time range of values. Specify a comma-separated list of times to create a custom histogram (e.g. "0.01,0.05,1,5,10"). |
| -i | Interval in seconds. Specify 0 for fast ping. |
| -l | Request size. Append 'k' for kilobytes and 'm' for megabytes. |
| -n | Number of pings or append 's' to specify seconds e.g. '10s'. |
| -q | Don't output during pings. |
| -t | Ping until stopped with Ctrl+C and type Ctrl+Break for statistics. |
| -w | Warmup with the specified number of iterations (default is 1). |
| -4 | Force using IPv4. |
| -6 | Force using IPv6. |
For high-speed ping tests use -q and -i 0.
TCP and UDP latency usage:
server: psping [[-6]|[-4]] [-f] <-s source:sourceport>
client: psping [[-6]|[-4]] [-f] [-u] [-h [buckets | <val1>,<val2>,...]] [-r] <-l requestsize>[k|m]] <-n count> [-w <count>] <destination:destport>
| -f | Open source firewall port during the run. |
| -u | UDP (default is TCP). |
| -h | Print histogram (default bucket count is 20). If you specify a single argument, it's interpreted as a bucket count and the histogram will contain that number of buckets covering the entire time range of values. Specify a comma-separated list of times to create a custom histogram (e.g. "0.01,0.05,1,5,10"). |
| -l | Request size. Append 'k' for kilobytes and 'm' for megabytes. |
| -n | Number of sends/receives. Append 's' to specify seconds e.g. '10s' |
| -r | Receive from the server instead of sending. |
| -w | Warmup with the specified number of iterations (default is 5). |
| -4 | Force using IPv4. |
| -6 | Force using IPv6. |
| -s | Server listening address and port. |
The server can serve both latency and bandwidth tests and remains active until you terminate it with Control-C.
TCP and UDP bandwidth usage:
server: psping [[-6]|[-4]] [-f] <-s source:sourceport>
client: psping [[-6]|[-4]] [-f] [-u] [-h [buckets | <val1>,<val2>,...]] [-r] <-l requestsize>[k|m]] <-n count> [-i <outstanding>] [-w <count>] <destination:destport>
| -f | Open source firewall port during the run. |
| -u | UDP (default is TCP). |
| -b | Bandwidth test. |
| -h | Print histogram (default bucket count is 20). If you specify a single argument, it's interpreted as a bucket count and the histogram will contain that number of buckets covering the entire time range of values. Specify a comma-separated list of times to create a custom histogram (e.g. "0.01,0.05,1,5,10"). |
| -i | Number of outstanding I/Os (default is min of 16 and 2x CPU cores). |
| -l | Request size. Append 'k' for kilobytes and 'm' for megabytes. |
| -n | Number of sends/receives. Append 's' to specify seconds e.g. '10s' |
| -r | Receive from the server instead of sending. |
| -w | Warmup for the specified iterations (default is 2x CPU cores). |
| -4 | Force using IPv4. |
| -6 | Force using IPv6. |
| -s | Server listening address and port. |
The server can serve both latency and bandwidth tests and remains active until you terminate it with Control-C.
Examples
This command executes an ICMP ping test for 10 iterations with 3 warmup iterations:
psping -n 10 -w 3 marklap
To execute a TCP connect test, specify the port number. The following command executes connect attempts against the target as quickly as possible, only printing a summary when finished with the 100 iterations and 1 warmup iteration:
psping -n 100 -i 0 -q marklap:80
To configure a server for latency and bandwidth tests, simply specify the -s option and the source address and port the server will bind to:
psping -s 192.168.2.2:5000
A buffer size is required to perform a TCP latency test. This example measures the round trip latency of sending an 8KB packet to the target server, printing a histogram with 100 buckets when completed:
psping -l 8k -n 10000 -h 100 192.168.2.2:5000
This command tests bandwidth to a PsPing server listening at the target IP address for 10 seconds and produces a histogram with 100 buckets. Note that the test must run for at least one second after warmup for a histogram to generate. Simply add -u to have PsPing perform a UDP bandwidth test.
psping -b -l 8k -n 10000 -h 100 192.168.2.2:5000
---------------------------
附2:
tcp_tw_recycle和tcp_timestamps导致connect失败问题
近来线上陆续出现了一些connect失败的问题,经过分析试验,最终确认和proc参数tcp_tw_recycle/tcp_timestamps相关;
1. 现象
第一个现象:模块A通过NAT网关访问服务S成功,而模块B通过NAT网关访问服务S经常性出现connect失败,抓包发现:服务S端已经收到了syn包,但没有回复synack;另外,模块A关闭了tcp timestamp,而模块B开启了tcp timestamp;
第二个现象:不同主机上的模块C(开启timestamp),通过NAT网关(1个出口ip)访问同一服务S,主机C1 connect成功,而主机C2 connect失败;
2. 分析
根据现象上述问题明显和tcp timestmap有关;查看linux 2.6.32内核源码,发现tcp_tw_recycle/tcp_timestamps都开启的条件下,60s内同一源ip主机的socket connect请求中的timestamp必须是递增的。
源码函数:tcp_v4_conn_request(),该函数是tcp层三次握手syn包的处理函数(服务端);
源码片段:
if (tmp_opt.saw_tstamp &&
tcp_death_row.sysctl_tw_recycle &&
(dst = inet_csk_route_req(sk, req)) != NULL &&
(peer = rt_get_peer((struct rtable *)dst)) != NULL &&
peer->v4daddr == saddr) {
if (get_seconds() < peer->tcp_ts_stamp + TCP_PAWS_MSL &&
(s32)(peer->tcp_ts - req->ts_recent) >
TCP_PAWS_WINDOW) {
NET_INC_STATS_BH(sock_net(sk), LINUX_MIB_PAWSPASSIVEREJECTED);
goto drop_and_release;
}
}
tmp_opt.saw_tstamp:该socket支持tcp_timestamp
sysctl_tw_recycle:本机系统开启tcp_tw_recycle选项
TCP_PAWS_MSL:60s,该条件判断表示该源ip的上次tcp通讯发生在60s内
TCP_PAWS_WINDOW:1,该条件判断表示该源ip的上次tcp通讯的timestamp 大于 本次tcp
分析:主机client1和client2通过NAT网关(1个ip地址)访问serverN,由于timestamp时间为系统启动到当前的时间,因此,client1和client2的timestamp不相同;根据上述syn包处理源码,在tcp_tw_recycle和tcp_timestamps同时开启的条件下,timestamp大的主机访问serverN成功,而timestmap小的主机访问失败;
参数:/proc/sys/net/ipv4/tcp_timestamps - 控制timestamp选项开启/关闭
/proc/sys/net/ipv4/tcp_tw_recycle - 减少timewait socket释放的超时时间
3. 解决方法
echo 0 > /proc/sys/net/ipv4/tcp_tw_recycle;
tcp_tw_recycle默认是关闭的,有不少服务器,为了提高性能,开启了该选项;
为了解决上述问题,个人建议关闭tcp_tw_recycle选项,而不是timestamp;因为 在tcp timestamp关闭的条件下,开启tcp_tw_recycle是不起作用的;而tcp timestamp可以独立开启并起作用。
源码函数: tcp_time_wait()
源码片段:
if (tcp_death_row.sysctl_tw_recycle && tp->rx_opt.ts_recent_stamp)
recycle_ok = icsk->icsk_af_ops->remember_stamp(sk);
......
if (timeo < rto)
timeo = rto;
if (recycle_ok) {
tw->tw_timeout = rto;
} else {
tw->tw_timeout = TCP_TIMEWAIT_LEN;
if (state == TCP_TIME_WAIT)
timeo = TCP_TIMEWAIT_LEN;
}
inet_twsk_schedule(tw, &tcp_death_row, timeo,
TCP_TIMEWAIT_LEN);
timestamp和tw_recycle同时开启的条件下,timewait状态socket释放的超时时间和rto相关;否则,超时时间为TCP_TIMEWAIT_LEN,即60s;
内核说明文档 对该参数的介绍如下:
tcp_tw_recycle - BOOLEAN
Enable fast recycling TIME-WAIT sockets. Default value is 0.
It should not be changed without advice/request of technical
experts.
原文链接:http://blog.sina.com.cn/u/2015038597
-----------------------------
附2:
一.情况表现为
1.在公司内网对站点的http访问:
linux主机出现故障:curl以及抓包分析,发现服务端不响应linux客户端的请求,无法建立TCP连接,浏览器返回“无法连接到服务器”
windows主机正常
2.http访问质量下降:
基调显示,新架构上线后,访问质量下滑,主要表现为
2.1.访问提示“无法连接到服务器”
2.2.仅少数人遇到这种故障,并且一天中不是每次访问都会遇到,而是出现时好时坏的现象
二.处理过程
直接上google搜索关键字“服务器无法建立TCP连接”。
翻了几页后。
看了一下,和我们公司内网的表现一模一样,但各种问题(1为这方面基础知识薄弱,2为没有时间验证此配置)
然后这种问题持续了n久...一直以为是内部设备问题
后期搞不定了,大胆在线上启用这个参数“net.ipv4.tcp_timestamps = 0”,做了下测试后,发现故障解除,原故障机每次访问都正常了!
不过还是不明其中原理,只是大意了解,同样处于NAT上网方式的用户里(与别人共用出口IP地址),如果你的时间戳小于别人的,那么服务器不会响应你的TCP请求,要忽略此项,将net.ipv4.tcp_timestamps = 0(/etc/sysctl.conf)
三.总结
后期学习时,看见了一个更加详细的博客,讲的很详细,也引入了新的问题:
====== 小抄 ======
其实,linux服务器原本对时间戳(timestamps)默认是不开启的,Linux是否启用这种行为取决于tcp_timestamps和tcp_tw_recycle,因为tcp_timestamps缺省就是开启的,所以当tcp_tw_recycle被开启后,实际上这种行为就被激活了。
net.ipv4.tcp_tw_recycle又是啥呢,搜索了一下基本上是TIME_WAIT连接的回收参数
当 net.ipv4.tcp_timestamps 没有设置(缺省为开启),并且 net.ipv4.tcp_tw_recycle 也开启时,这个坑爹的错误就出现了,但是注意,只表现在NAT网络环境中。而且,大多数博客,以及一些大牛们,都有说过要开启 net.ipv4.tcp_tw_recycle ...
====== 小抄 ======
四.未完成的事项
1.(未验证)关闭timestamps后,tw_recycle功能是失效的问题
2.(未验证)新的解决TIME_WAIT连接过多的方法:net.ipv4.tcp_max_tw_buckets = 10000 设置一个最大值,不过坏处是系统日志会提示:TCP: time wait bucket table overflow