docker设置VPN - IPsec VPN Server on Docker
之前在centos 一直使用PPTP设置vpn, 不知什么原因常常断掉, 困绕了很长时间,学习docker之后,解决问题的方式总是想使用docker, 不想再在配置vpn上花费太多时间,找到一个 IPsec 的L2TP 版本的docker 使用,就算没搞定,也不会污了服务器系统环境:
-------2018-04-06 ----- 注
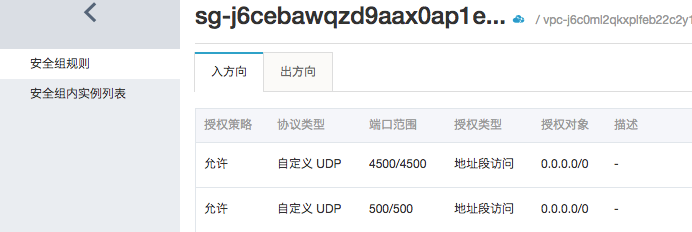
如果你使用的是阿里云, 注意端口放行...
另这个docker也不错:
https://hub.docker.com/r/hwdsl2/ipsec-vpn-server/
配置过程:
下载docker 镜像:
docker pull fcojean/l2tp-ipsec-vpn-server
2. 写一个 vpn.env 文件 , 用来配置vpn的share key 和 vpn 帐号密码,例红色字体为你自己自定义的部分
# Define your own values for these variables
# - IPsec pre-shared key, VPN username and password
# - DO NOT put quotes around values, or add space around '='
# - DO NOT use these characters within values: \ " '
VPN_IPSEC_PSK=test_shared_secret_key
# Table of user object with login and password attribute in Json format
VPN_USER_CREDENTIAL_LIST=[{"login":"userTest1","password":"test1"},{"login":"userTest2","password":"test2"}]
3. 重要的一步,加载 IPsec 的内核模块:执行一下命令:
sudo modprobe af_key
4. 运行docker: 注意,红色字是你上面配置的vpn 环境变量(share key , 用户名密码)
docker run \
    --name l2tp-ipsec-vpn-server \
    --env-file ./vpn.env \
    -p 500:500/udp \
    -p 4500:4500/udp \
    -v /lib/modules:/lib/modules:ro \
    -d --privileged \
    fcojean/l2tp-ipsec-vpn-server
执行完毕后:

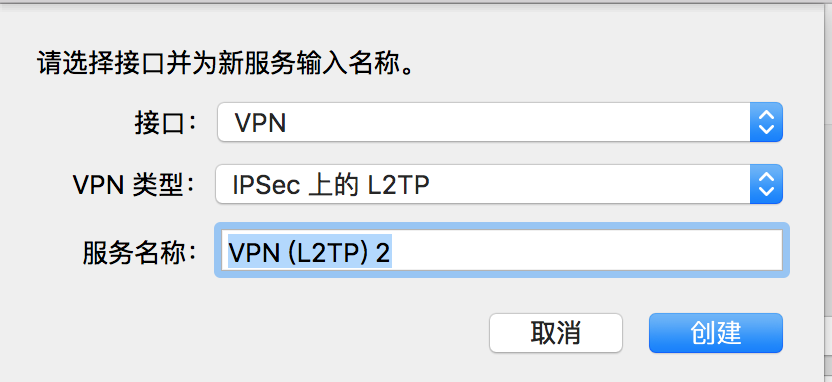
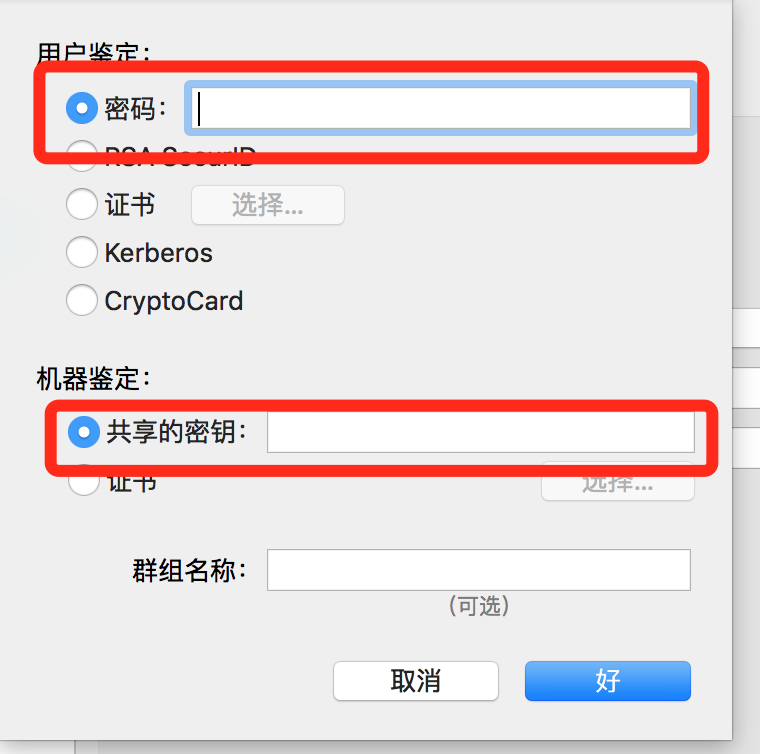
5. mac 下配置客户端:
配置用户名密码:

点击鉴定设置去密码和共享密钥,对应上面 vpn.env 里的设置
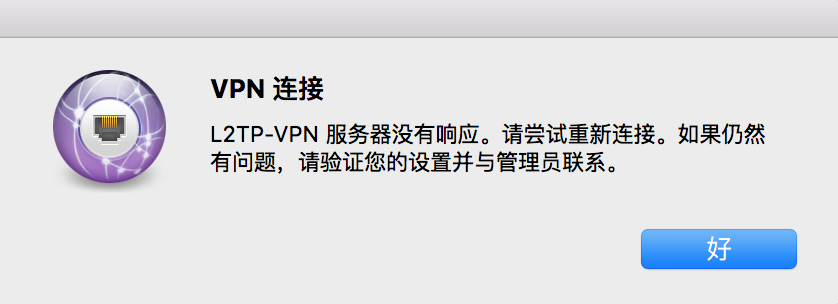
5. 一切就续:发现登录不上去:
使用 以下命令查看vpn连接日志:
docker logs l2tp-ipsec-vpn-server
超时报错:
xl2tpd[1]: Connection 16 closed to 183.167.211.91, port 64143 (Timeout)
xl2tpd[1]: Unable to deliver closing message for tunnel 47006. Destroying anyway.
xl2tpd[1]: Maximum retries exceeded for tunnel 33207. Closing.
xl2tpd[1]: Connection 17 closed to 183.167.211.91, port 62766 (Timeout)
xl2tpd[1]: Unable to deliver closing message for tunnel 33207. Destroying anyway.
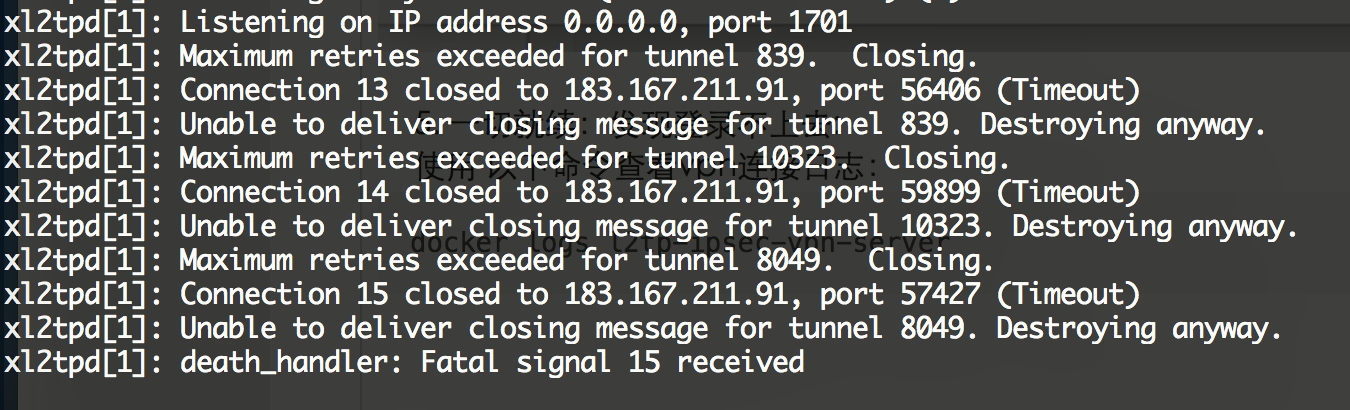
解决方法:
手动在docker 内执行命令:
/run.sh
客户端连接成功:

------------------------------------------------------------------------------
再次出现VPN无法连接:
查看日志: docker exec -it vpn ipsec status
错误信息:
000
000 State Information: DDoS cookies not required, Accepting new IKE connections
000 IKE SAs: total(3), half-open(0), open(3), authenticated(0), anonymous(0)
000 IPsec SAs: total(0), authenticated(0), anonymous(0)
000
000 #3: "l2tp-psk"[1] 180.169.77.20:500 STATE_MAIN_R1 (sent MR1, expecting MI2); EVENT_SA_EXPIRE in 3599s; lastdpd=-1s(seq in:0 out:0); idle; import:not set
000 #1: "l2tp-psk"[1] 180.169.77.20:500 STATE_MAIN_R1 (sent MR1, expecting MI2); EVENT_SA_EXPIRE in 3593s; lastdpd=-1s(seq in:0 out:0); idle; import:not set
000 #2: "l2tp-psk"[1] 180.169.77.20:500 STATE_MAIN_R1 (sent MR1, expecting MI2); EVENT_SA_EXPIRE in 3596s; lastdpd=-1s(seq in:0 out:0); idle; import:not set
000
000 Bare Shunt list:
解决方法:
IPsec VPN Server on Docker
Docker image to run an IPsec VPN server, with support for both IPsec/L2TP and IPsec/XAuth ("Cisco IPsec").
Based on Debian Jessie with Libreswan (IPsec VPN software) and xl2tpd (L2TP daemon).
This docker image is based on Lin Song work and adds those features:
Multiple VPN users declaration support
Native NAT Transversal support
No waiting time before a user can reconnect in case of disconnection support
Install Docker
Follow these instructions to get Docker running on your server.
Download
Get the trusted build from the Docker Hub registry:
docker pull fcojean/l2tp-ipsec-vpn-server
or download and compile the source yourself from GitHub:
git clone https://github.com/fcojean/l2tp-ipsec-vpn-server.git
cd l2tp-ipsec-vpn-server
docker build -t fcojean/l2tp-ipsec-vpn-server .
How to use this imageEnvironment variables
This Docker image uses the following two environment variables, that can be declared in an env file (see vpn.env.example file):
VPN_IPSEC_PSK=<IPsec pre-shared key>
VPN_USER_CREDENTIAL_LIST=[{"login":"userTest1","password":"test1"},{"login":"userTest2","password":"test2"}]
The IPsec PSK (pre-shared key) is specified by the VPN_IPSEC_PSK environment variable. Multiple users feature is supported. VPN user credentials is defined in VPN_USER_CREDENTIAL_LIST environnement variable. Users login and password must be defined in a json format array. Each user should be define with a "login" and a "password" attribute.
Note: In your env file, DO NOT put single or double quotes around values, or add space around =. Also, DO NOT use these characters within values: \ " '
All the variables to this image are optional, which means you don't have to type in any environment variable, and you can have an IPsec VPN server out of the box! Read the sections below for details.
Start the IPsec VPN server
VERY IMPORTANT ! First, run this command on the Docker host to load the IPsec NETKEY kernel module:
sudo modprobe af_key
Start a new Docker container with the following command (replace ./vpn.env with your own env file) :
docker run \
    --name l2tp-ipsec-vpn-server \
    --env-file ./vpn.env \
    -p 500:500/udp \
    -p 4500:4500/udp \
    -v /lib/modules:/lib/modules:ro \
    -d --privileged \
    fcojean/l2tp-ipsec-vpn-server
Retrieve VPN login details
If you did not set environment variables via an env file, a vpn user login will default to vpnuser and both VPN_IPSEC_PSK and vpn user password will be randomly generated. To retrieve them, show the logs of the running container:
docker logs l2tp-ipsec-vpn-server
Search for these lines in the output:
Connect to your new VPN with these details:Server IP: <VPN Server IP>IPsec PSK: <IPsec pre-shared key>Users credentials :Login : <vpn user_login_1> Password : <vpn user_password_1>...Login : <vpn user_login_N> Password : <vpn user_password_N>
Check server status
To check the status of your IPsec VPN server, you can pass ipsec status to your container like this:
docker exec -it l2tp-ipsec-vpn-server ipsec status
Next Steps
Get your computer or device to use the VPN. Please refer to:
Configure IPsec/L2TP VPN Clients
Configure IPsec/XAuth VPN Clients
Enjoy your very own VPN! ✨